
Motivated by technology, I read different topics every week and some of them really get my attention.
Libreboot.
What the hell is libreboot? Libreboot is a open source BIOS. As a very very short summary, it is not that bad. You can read more about it on https://libreboot.org/
Why did this topic get my attention? Open source, hardware, new topic (for me), not so much people doing it. I cannot think on a better stuff to work on.
Although thinking on a BIOS might be very challenging (it is), it won’t be that challenging for us. It is just a matter of downloading some file and writing it to a device. It sounds easy, doesn’t it?.
I spent lot of time reading the official documentation. I spent lot of time not because of the long documentation, not because of the complexity either but, in my honest opinion, because of the bad organisation.
First of all, here is the link to the official documentation https://libreboot.org/docs/install/t480.html
Pre-requisites
- A working laptop running Ubuntu 24.04 (this one won’t be the laptop I will flash libreboot to) with git
- Raspberry pico
- Clip 8 pins
- Dupont cable female 2 male
- Micro USB cable
Prepare the programmer laptop
I cloned the official libreboot git repository.
git clone https://codeberg.org/libreboot/lbmkInstalled dependencies for Ubuntu 24.04.
cd lbmk
./mk dependencies ubuntu2404
Although it might not make sense, I had to also install dependencies for Debian OS too. Installing only Ubuntu 24.04 dependencies gave me an error when running some of the required tools (I will paste it a bit later).
./mk dependencies debianPrior to running above command, I tried to run flashprog tool but I got below error. That is why I had to install dependencies for Debian OS.
jjdiaz@laptop-HN-WX9X:\~/git/libreboot/lbmk$ CONFIG_feature=no ./mk -b flashprog config/data/flashprog/mkhelper.cfg missing config/flashprog/target.cfg already exists Loading flashprog config: config/flashprog/target.cfg config/data/flashprog/mkhelper.cfg missing config/flashprog/target.cfg already exists Loading flashprog config: config/flashprog/target.cfg make: Entering directory '/home/jjdiaz/git/libreboot/lbmk/src/flashprog' Replacing all version templates with p1.4-2-gf730186. Building flashprog version p1.4-2-gf730186 C compiler found: cc (Ubuntu 13.3.0-6ubuntu2\~24.04) 13.3.0 Target arch: x86 Target OS: Linux Target endian: little Dependency libpci found: yes 3.10.0 Checking for old "pci_get_dev()": no CFLAGS: -I/usr/include/x86_64-linux-gnu LDFLAGS: -lpci -lz -lresolv -ludev Dependency libusb1 found: yes 1.0.27 CFLAGS: -I/usr/include/libusb-1.0 LDFLAGS: -lusb-1.0 -ludev Dependency libjaylink found: no Dependency NI-845x found: no Dependency libftdi1 found: no Dependency libgpiod found: no Checking for header "mtd/mtd-user.h": yes Checking for header "linux/spi/spidev.h": yes Checking for header "linux/i2c-dev.h": yes Checking for header "linux/i2c.h": yes Checking for header "sys/utsname.h": yes Checking for function "clock_gettime": yes Checking for external "librt": yes The following features require libftdi1: CONFIG_FT2232_SPI=yes CONFIG_USBBLASTER_SPI=yes The following features require libgpiod: CONFIG_LINUX_GPIO_SPI=yes The following features require libjaylink: CONFIG_JLINK_SPI=yes You can disable individual features with CONFIG_feature=no in your make command. make: \*\*\* \[Makefile:968: config\] Error 1 make: Leaving directory '/home/jjdiaz/git/libreboot/lbmk/src/flashprog' ERROR ./mk: Unhandled error for: make -C src/flashprog -j1 WARNERROR=no ERROR ./mk: Unhandled error for: ./mk -b flashprogPrepare raspberry pico
I built raspberry firmware. Inside the cloned repository folder, I ran below command.
./mk -b pico-serprogAbove command will generated some files in ./bin folder.
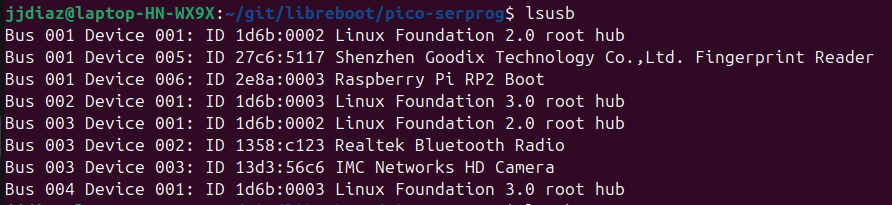
I connected the raspbery pico while pressing BOOTSEL button in the raspberry to the laptop USB. I ran command lsusb to see if the laptop detected the raspberry correctly (note the Raspberry Pi RP2 Boot device).
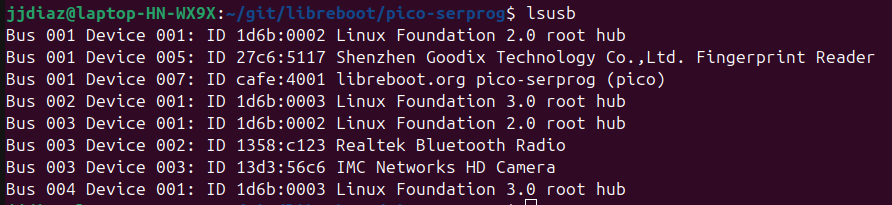
After inserting the raspberry, it should appear as any other usb storage device. I copied the file ./bin/serprog_pico/serprog_pico.uf2 to it. After pasting the file, the raspberry got restarted automatically. I ran lsusb command again and I notice that the name of the device was different (note the libreboot.org pico-serprog (pico) device).
The raspberry was ready to start working.
Prepare thinkpad laptop
I built flashprog firmware. Inside the cloned repository folder, I ran below command.
./mk -b flashprogOnce the build was completed, some binary files were generated at ./elf/flashprog/flashprog
NOTE: BEFORE CONNECTING THE RASPBERRY PICO TO THE THINKPAD BOARD, I DISCONNECTED THINKPAD BATTERY AND CMOS BATTERY. I DIDN’T CONNECT THE RASPBERRY PICO TO THE UBUNTU LAPTOP’S USB PORT UNTIL I WAS SURE THAT IT IS COMPLETELY COUPLED TO THE THINKPAD BOARD.
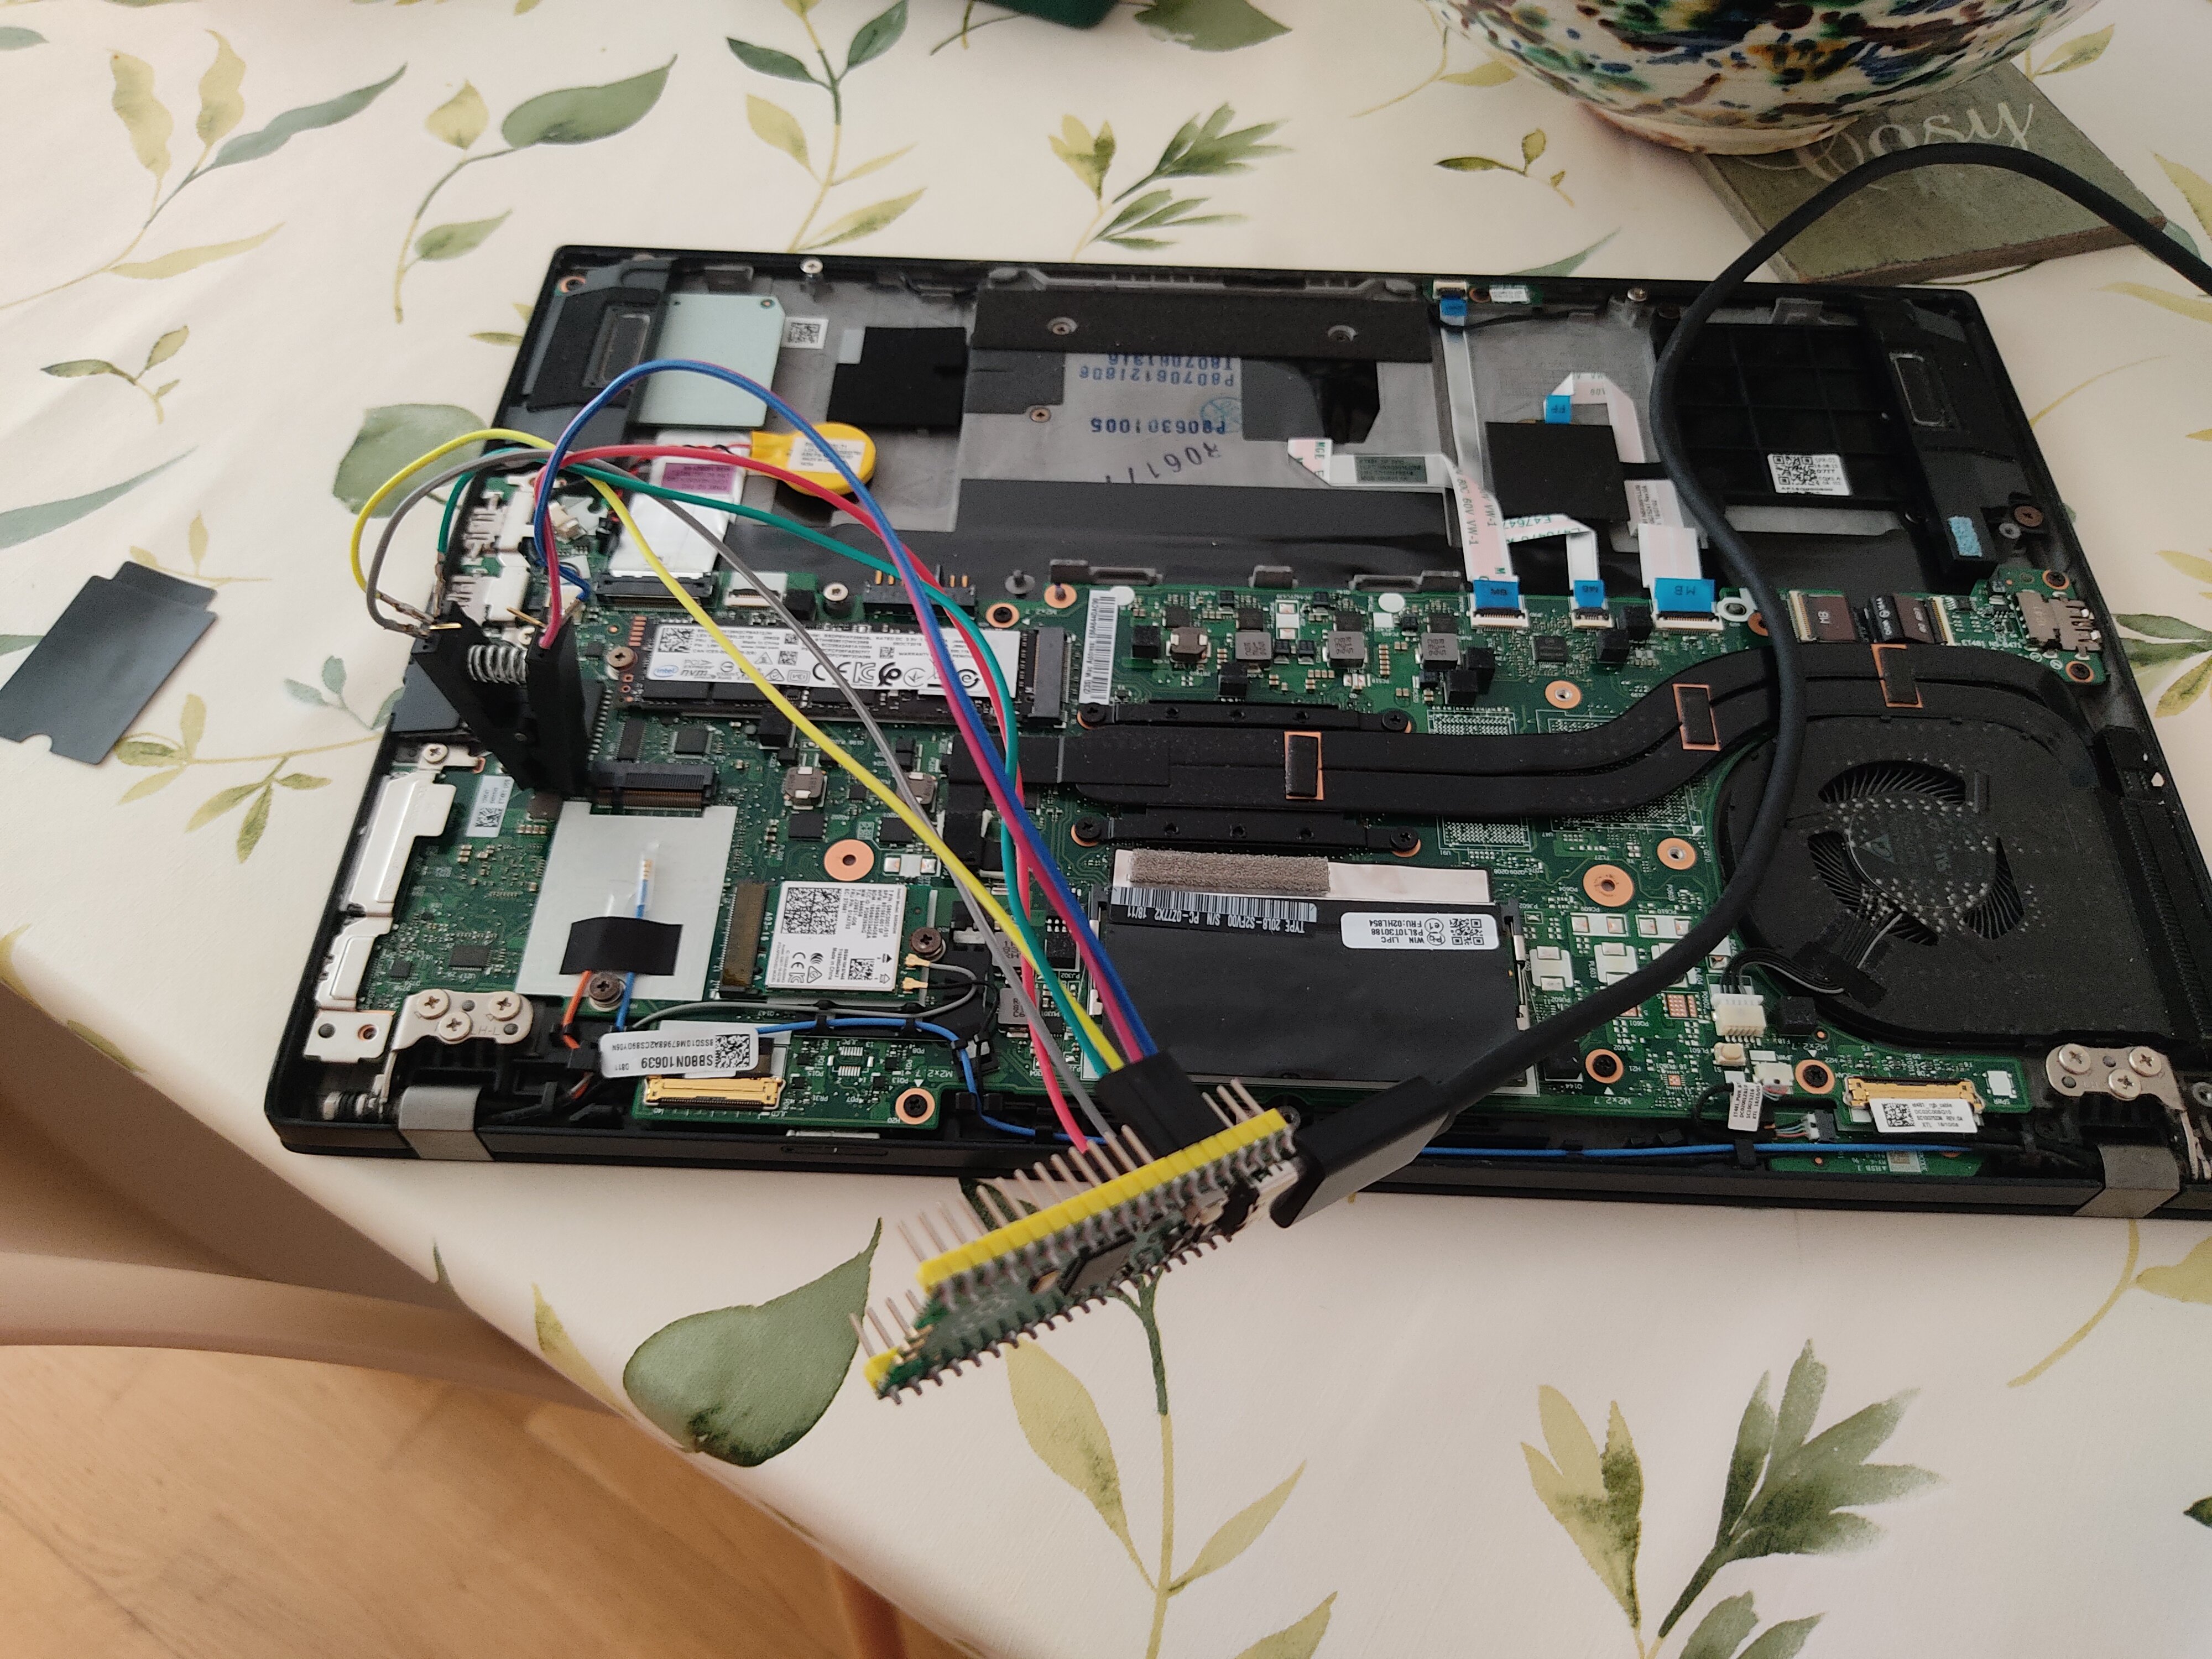
Wiring the raspberry pico
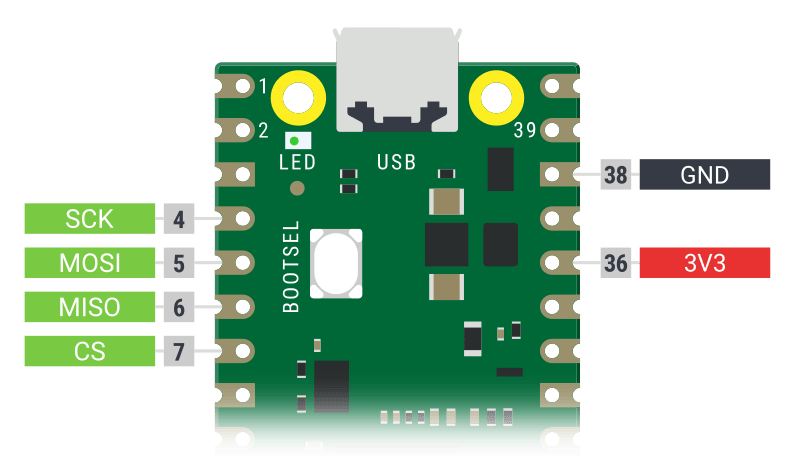
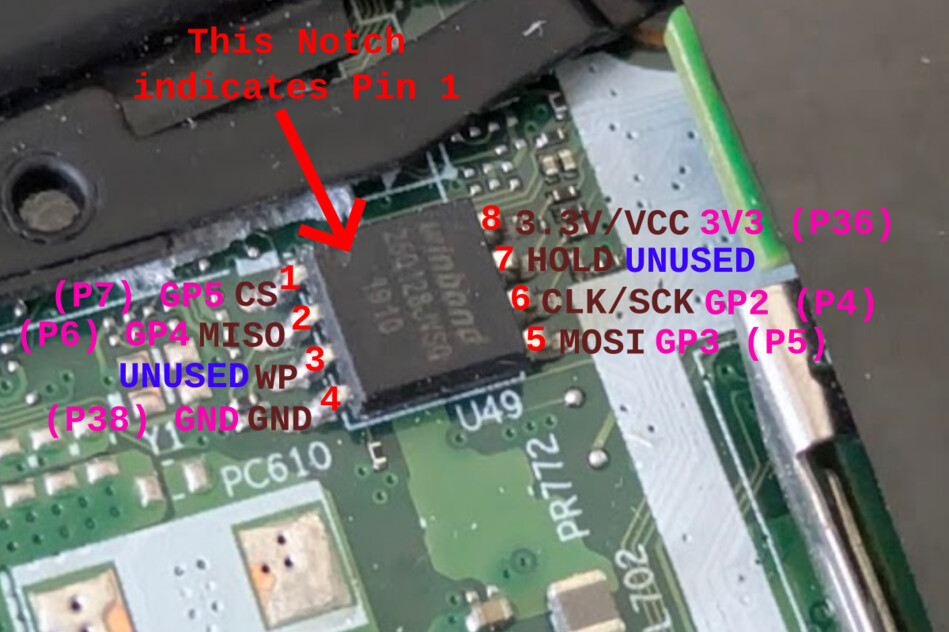
Above images show the raspberry pico pins must be connected to the BIOS and Thunderbolt chips.
- Raspberry pico pin 7 connected to the pin 1 of the clip
- Raspberry pico pin 6 connected to the pin 2 of the clip
- Raspberry pico pin 38 connected to the pin 4 of the clip
- Raspberry pico pin 5 connected to the pin 5 of the clip
- Raspberry pico pin 4 connected to the pin 6 of the clip
- Raspberry pico pin 36 connected to the pin 8 of the clip
Pin 1 of the chip is located top left side and pin 5 is located bottom right side.
Below image shows how things looked after I did all the connections.
Backup thunderbolt firmware
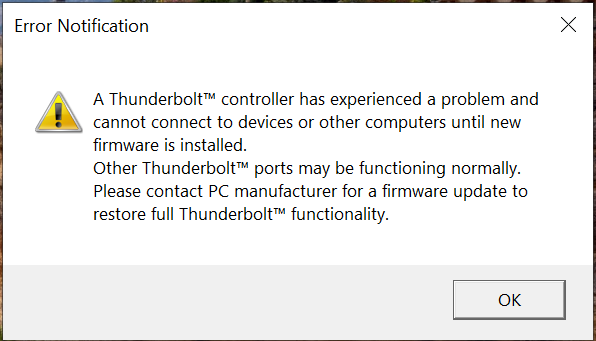
It is a very common issue in thinkpad t480s laptops that thunderbolt port is not working as expected due to an error in the firmware. I was 100% sure that I was affected by this issue. There is no other option. External flashing is required in order to fix the issue.
I was 100% sure that I was affected by the issue because I got an error message everytime I booted my laptop into Windows.
First step before going hands on the flashing process is to dump the current thunderbolt firmware just in case something goes wrong so I can restore it (note that the issue doesn’t mean the thunderbolt stop working but only working with usb devices and not loading as quick as it should).
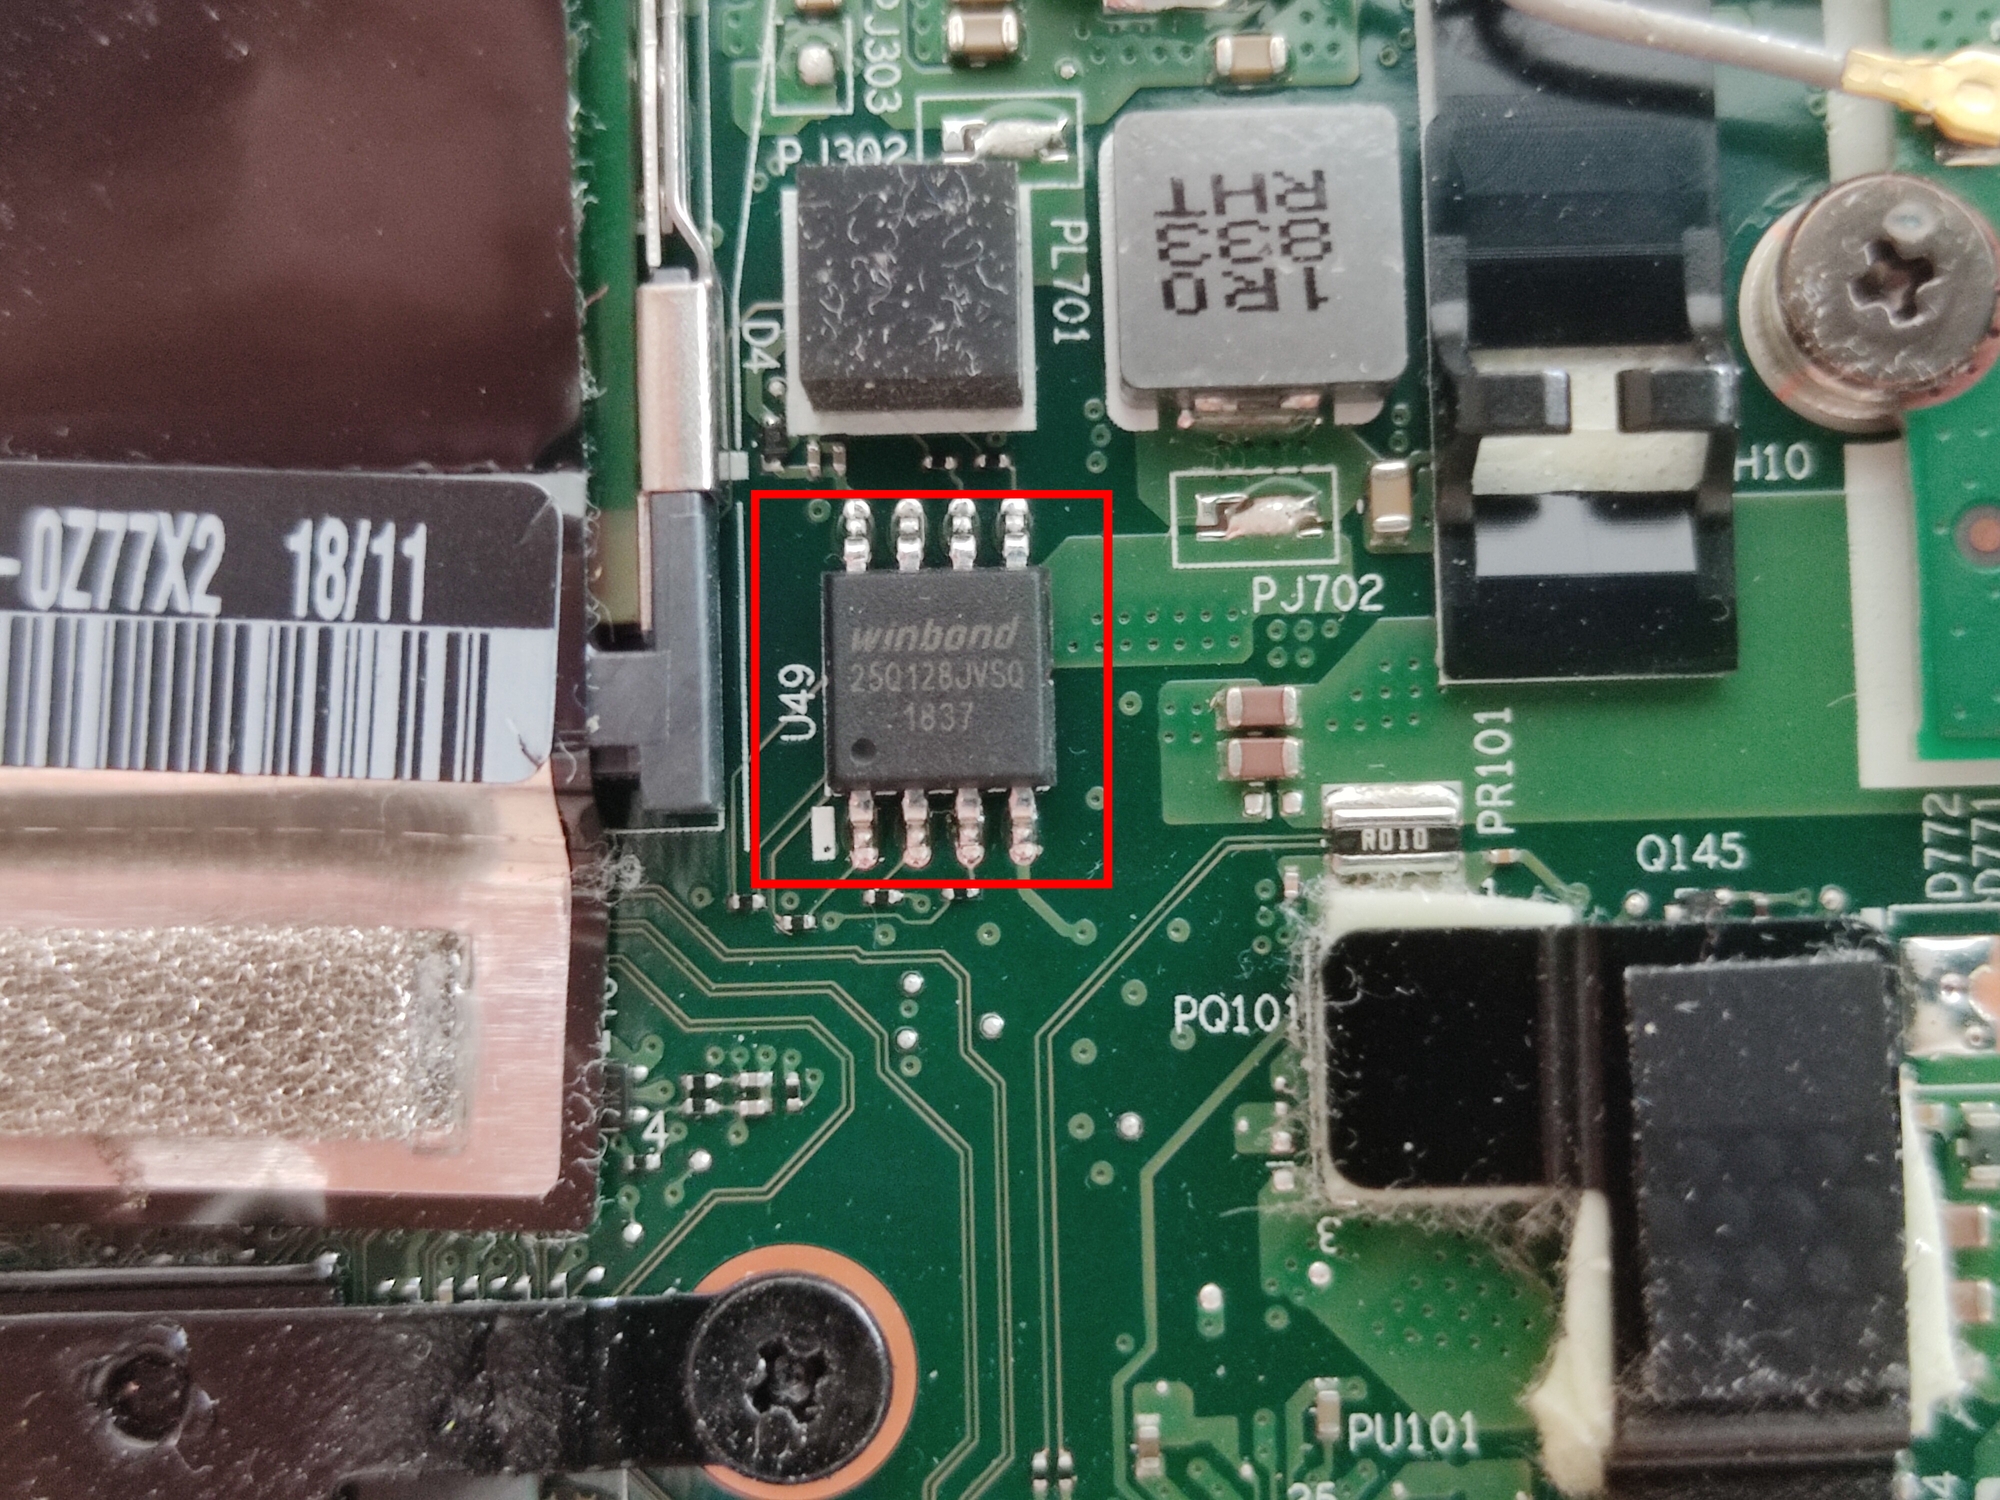
After wiring completely raspberry pico and the clip, before connecting the raspberry pico to the ubuntu laptop usb port, I connected the clip to the thunderbolt chip. The location of the chip is showed in the below images (note the red rectangle located on the top right side of the board).
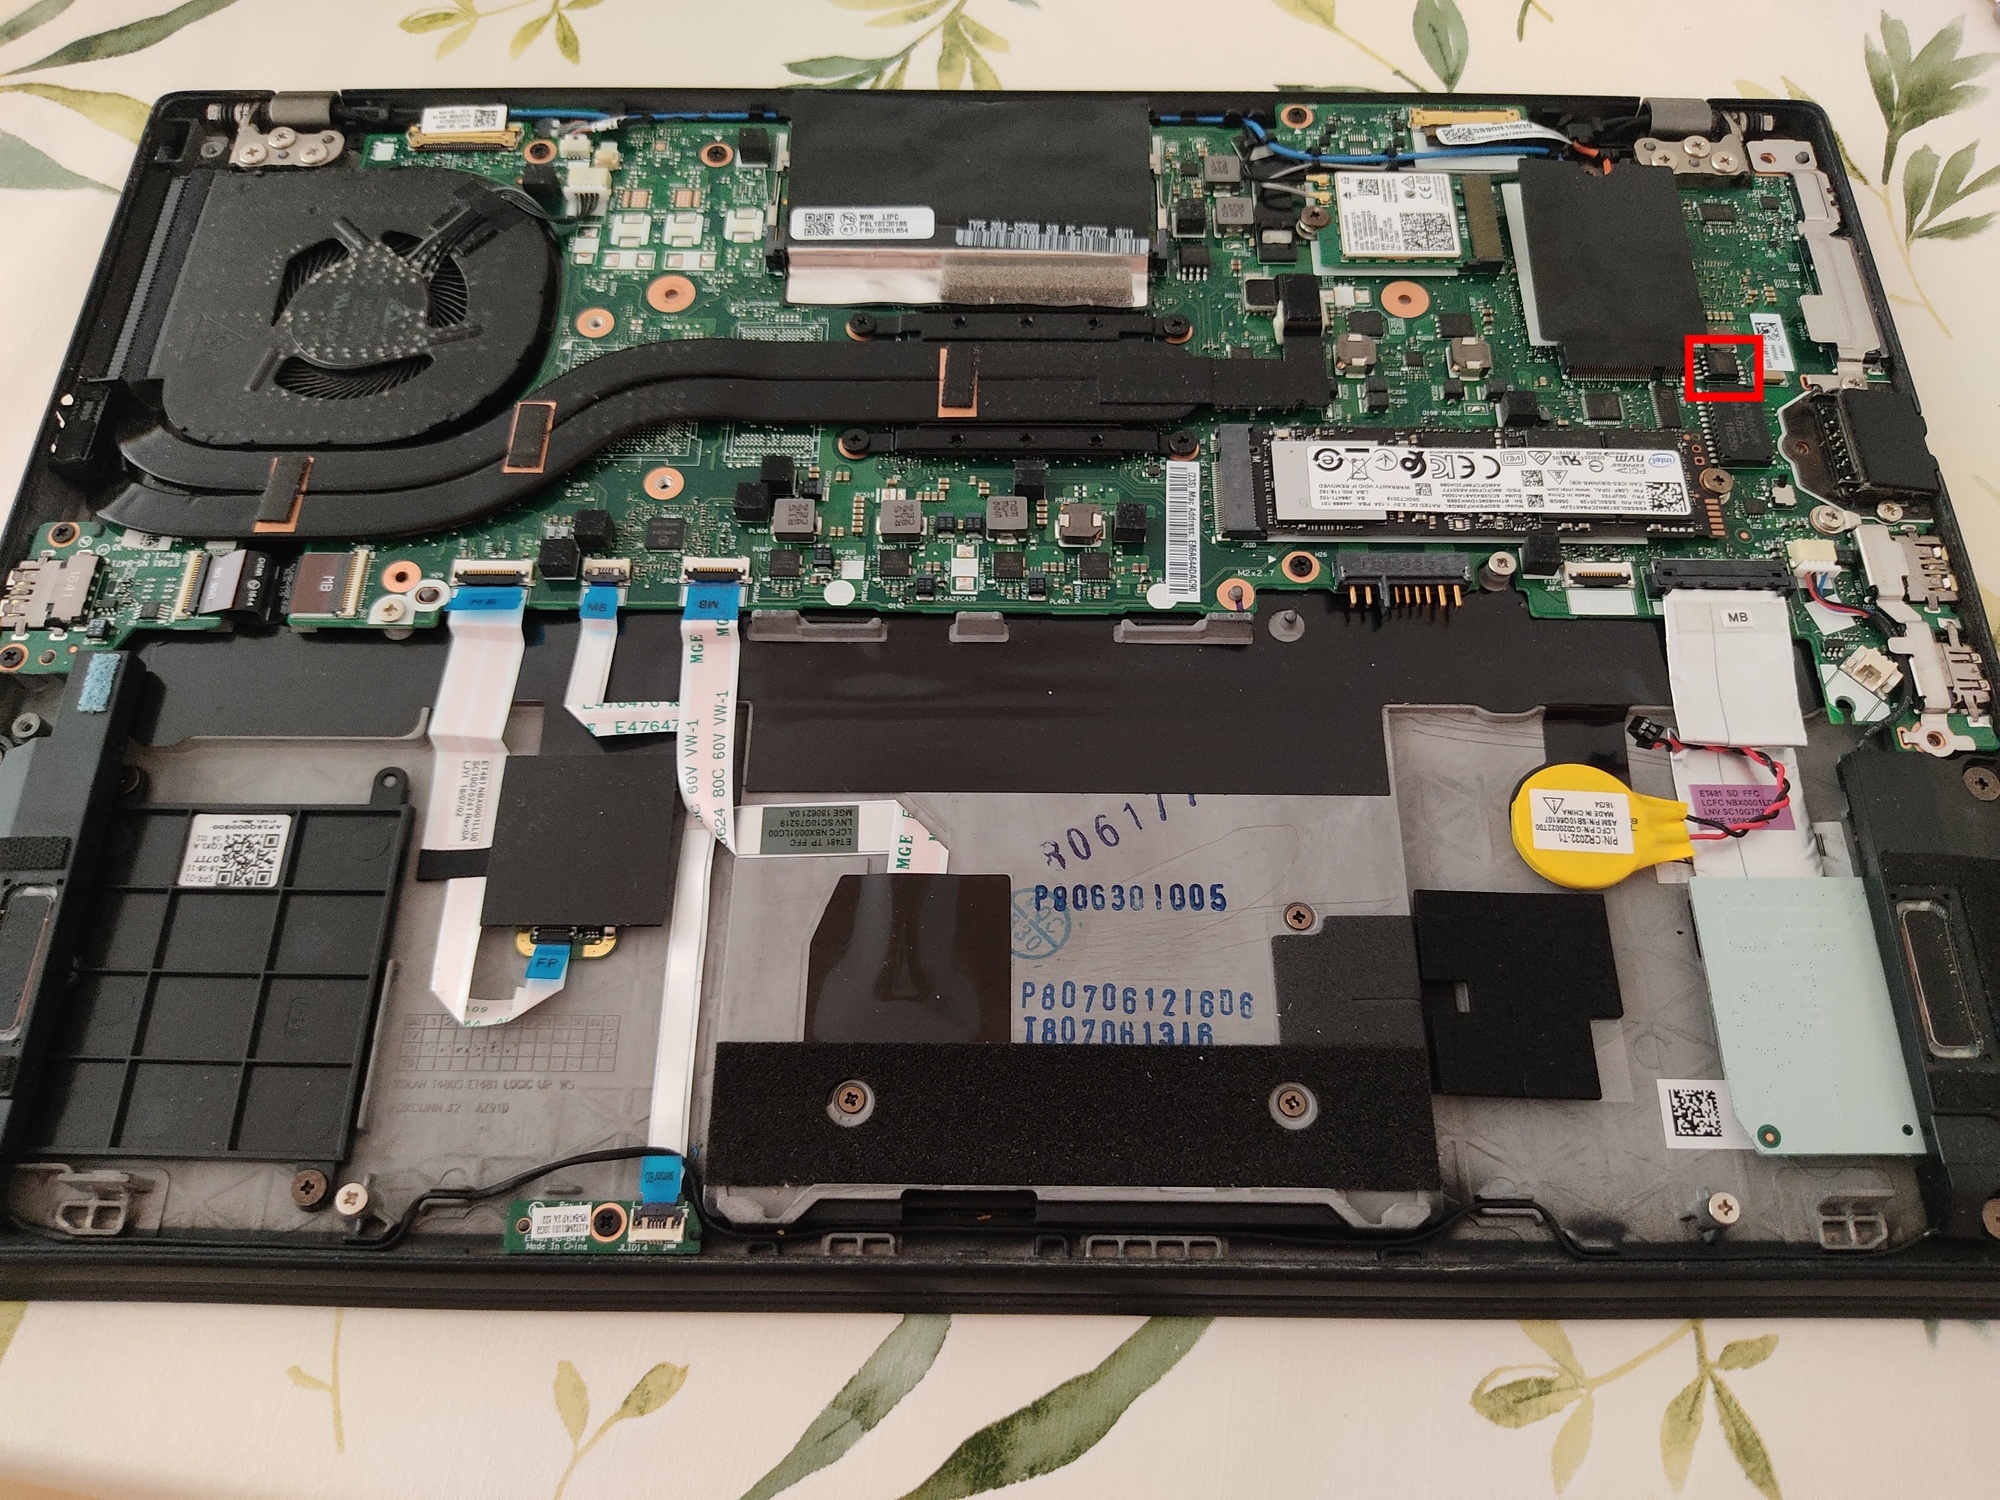
NOTE: The pin 1 of the chip is the one marked with a dot. The pin 1 of the clip must be connected to the pin 1 of the chip.
Once the clip is connected, it is time to start dumping the thunderbolt firmware.
Before being able to start taking the backup, I had to locate where the raspberry pico is mounted in the ubuntu laptop. To get the correct location, I ran below command.
sudo dmesg -wHWhile the command is running, I connected the raspberry pico to the ubuntu laptop and a message like the below snippet of code appeared.
\[jun 1 16:07\] usb 1-2: new full-speed USB device number 9 using xhci_hcd \[ +0,152742\] usb 1-2: New USB device found, idVendor=cafe, idProduct=4001, bcdDevice= 1.00 \[ +0,000014\] usb 1-2: New USB device strings: Mfr=1, Product=2, SerialNumber=3 \[ +0,000006\] usb 1-2: Product: pico-serprog (pico) \[ +0,000005\] usb 1-2: Manufacturer: libreboot.org \[ +0,000004\] usb 1-2: SerialNumber: 503558607A67521F \[ +0,033213\] cdc_acm 1-2:1.0: ttyACM0: USB ACM deviceIn my case, it means that the raspberry pico is mounted in /dev/ttyACM0.
To be on the safe side, I took 3 dumps and I compared them to ensure that all of them were exactly the same.
DUMP 1
jjdiaz@laptop-HN-WX9X:\~/git/libreboot/lbmk/dumps/thunderbolt$ ../../elf/flashprog/flashprog -p serprog:dev=/dev/ttyACM0,spispeed=16M -r dump1.bin flashprog p1.4-2-gf730186 on Linux 6.8.0-60-generic (x86_64) flashprog is free software, get the source code at https://flashprog.org

Using clock_gettime for delay loops (clk_id: 1, resolution: 1ns). serprog: Programmer name is "pico-serprog" Found Winbond flash chip "W25Q80.V" (1024 kB, SPI) on serprog. Reading flash... done.
DUMP 2
jjdiaz@laptop-HN-WX9X:\~/git/libreboot/lbmk/dumps/thunderbolt$ ../../elf/flashprog/flashprog -p serprog:dev=/dev/ttyACM0,spispeed=16M -r dump2.bin
flashprog p1.4-2-gf730186 on Linux 6.8.0-60-generic (x86_64)
flashprog is free software, get the source code at https://flashprog.org

Using clock_gettime for delay loops (clk_id: 1, resolution: 1ns).
serprog: Programmer name is "pico-serprog"
Found Winbond flash chip "W25Q80.V" (1024 kB, SPI) on serprog.
Reading flash... done.
DUMP 3
jjdiaz@laptop-HN-WX9X:\~/git/libreboot/lbmk/dumps/thunderbolt$ ../../elf/flashprog/flashprog -p serprog:dev=/dev/ttyACM0,spispeed=16M -r dump3.bin
flashprog p1.4-2-gf730186 on Linux 6.8.0-60-generic (x86_64)
flashprog is free software, get the source code at https://flashprog.org

Using clock_gettime for delay loops (clk_id: 1, resolution: 1ns).
serprog: Programmer name is "pico-serprog"
Found Winbond flash chip "W25Q80.V" (1024 kB, SPI) on serprog.
Reading flash... done.
After getting the three dumps, to verify all of the have exactly the same content, it was just a matter of checking the sha of all of them and comparing them.
jjdiaz@laptop-HN-WX9X:\~/git/libreboot/lbmk/dumps/thunderbolt$ sha512sum dump1.bin
831acf633b19ba806db400072b9f00562f39add0511836f6bd950d5cbd255088c23842a5fbedaecc0898a1869403cadcec17a81a16a9c2d3a3ae107e3c35b2bd  dump1.bin

jjdiaz@laptop-HN-WX9X:\~/git/libreboot/lbmk/dumps/thunderbolt$ sha512sum dump2.bin
831acf633b19ba806db400072b9f00562f39add0511836f6bd950d5cbd255088c23842a5fbedaecc0898a1869403cadcec17a81a16a9c2d3a3ae107e3c35b2bd  dump2.bin

jjdiaz@laptop-HN-WX9X:\~/git/libreboot/lbmk/dumps/thunderbolt$ sha512sum dump3.bin
831acf633b19ba806db400072b9f00562f39add0511836f6bd950d5cbd255088c23842a5fbedaecc0898a1869403cadcec17a81a16a9c2d3a3ae107e3c35b2bd  dump3.bin
Build thunderbolt firmware
Once the backup is completed, it is time to flash the correct firmware to fix the thunderbolt port issue.
Inside the cloned repository folder, I ran below command.
./mk -d coreboot t480s_vfsp_16mbThe command generated a file. It was located at ./vendorfiles/t480s/tb.bin
Flash thunderbolt firmware
Before flashing the new firmware, I had to remove the content of the chip. To do so, I created a file which content is full 0s.
dd if=/dev/zero of=null.bin bs=1M count=1After that, I flashed the file to the thunderbolt chip.
./elf/flashprog/flashprog -p serprog:dev=/dev/ttyACM0 -w null.binThe output of the command looked like the below snippet of code
jjdiaz@laptop-HN-WX9X:\~/git/libreboot/lbmk$ ./elf/flashprog/flashprog -p serprog:dev=/dev/ttyACM0 -w null.bin flashprog p1.4-2-gf730186 on Linux 6.8.0-60-generic (x86_64) flashprog is free software, get the source code at https://flashprog.org

Using clock_gettime for delay loops (clk_id: 1, resolution: 1ns).
serprog: Programmer name is "pico-serprog"
Found Winbond flash chip "W25Q80.V" (1024 kB, SPI) on serprog.
Reading old flash chip contents... done.
Erasing and writing flash chip... Erase/write done.
Verifying flash... VERIFIED.
Once the chip was completely erased, I had to reassembly everything (CMOS battery, thinkpad battery) and to start the computer. Once the OS is completely started, I powered off completely the thinkpad and removed CMOS and thinkpad batteries again.
Now, I flashed the new thunderbolt firmware to the chip.
./elf/flashprog/flashprog -p serprog:dev=/dev/ttyACM0 -w vendorfiles/t480s/tb.binOnce the flashing is completed, the output code looked like the below snippet of code
jjdiaz@laptop-HN-WX9X:\~/git/libreboot/lbmk$ ./elf/flashprog/flashprog -p serprog:dev=/dev/ttyACM0 -w vendorfiles/t480s/tb.bin
flashprog p1.4-2-gf730186 on Linux 6.8.0-60-generic (x86_64)
flashprog is free software, get the source code at https://flashprog.org

Using clock_gettime for delay loops (clk_id: 1, resolution: 1ns).
serprog: Programmer name is "pico-serprog"
Found Winbond flash chip "W25Q80.V" (1024 kB, SPI) on serprog.
Reading old flash chip contents... done.
Erasing and writing flash chip... FAILED at 0x0000205c! Expected=0xff, Found=0xef, failed byte count from 0x00000000-0x0000ffff: 0x17
ERASE FAILED!
FAILED!
Uh oh. Erase/write failed. Checking if anything has changed.
Reading current flash chip contents... done.
Apparently at least some data has changed.
Your flash chip is in an unknown state.
Please report this to the mailing list at [email protected]
or on IRC (see https://www.flashprog.org/Contact for details), thanks!


jjdiaz@laptop-HN-WX9X:\~/git/libreboot/lbmk$ ./elf/flashprog/flashprog -p serprog:dev=/dev/ttyACM0 -w vendorfiles/t480s/tb.bin
flashprog p1.4-2-gf730186 on Linux 6.8.0-60-generic (x86_64)
flashprog is free software, get the source code at https://flashprog.org

Using clock_gettime for delay loops (clk_id: 1, resolution: 1ns).
serprog: Programmer name is "pico-serprog"
Found Winbond flash chip "W25Q80.V" (1024 kB, SPI) on serprog.
Reading old flash chip contents... done.
Erasing and writing flash chip... Erase/write done.
Verifying flash... VERIFIED.
Note that I had to flash it twice because the first one failed while erasing the chip.
Once the flash was completed, I restarted the laptop and the thunderbolt error showed above was gone. I got it!
Backup BIOS firmware
As I did for the thunderbolt firmware, I did exactly the same for the BIOS firmware. Before updating the BIOS, for safety reasons, I backed up the BIOS.
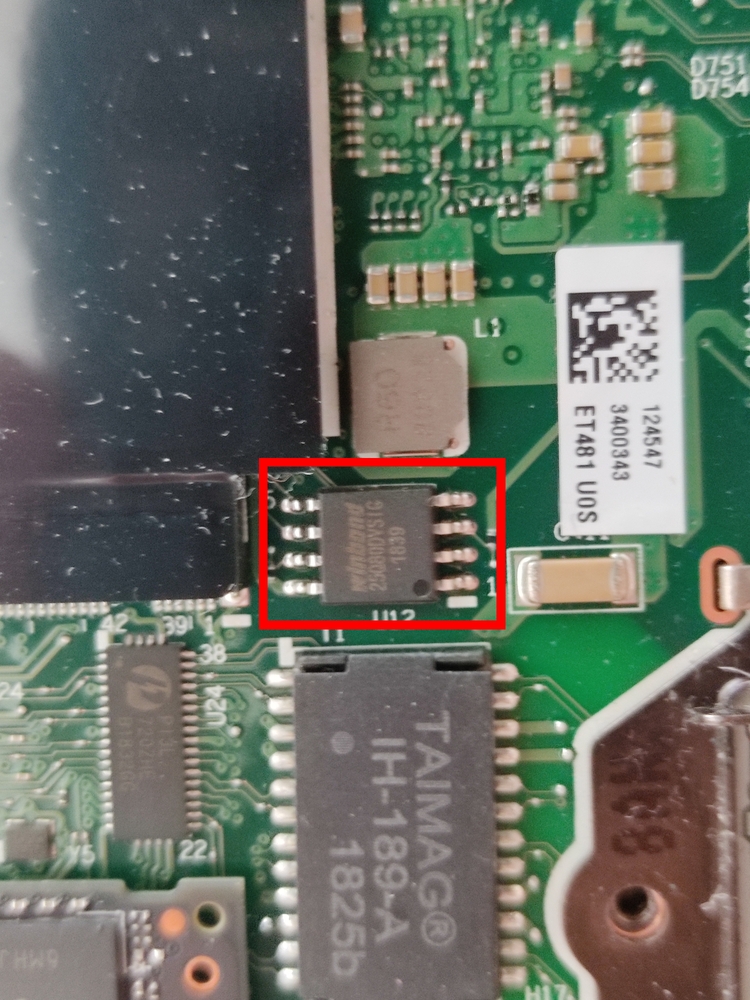
The location of the chip is showed in the below image (note the red rectangle located on the top center of the board).
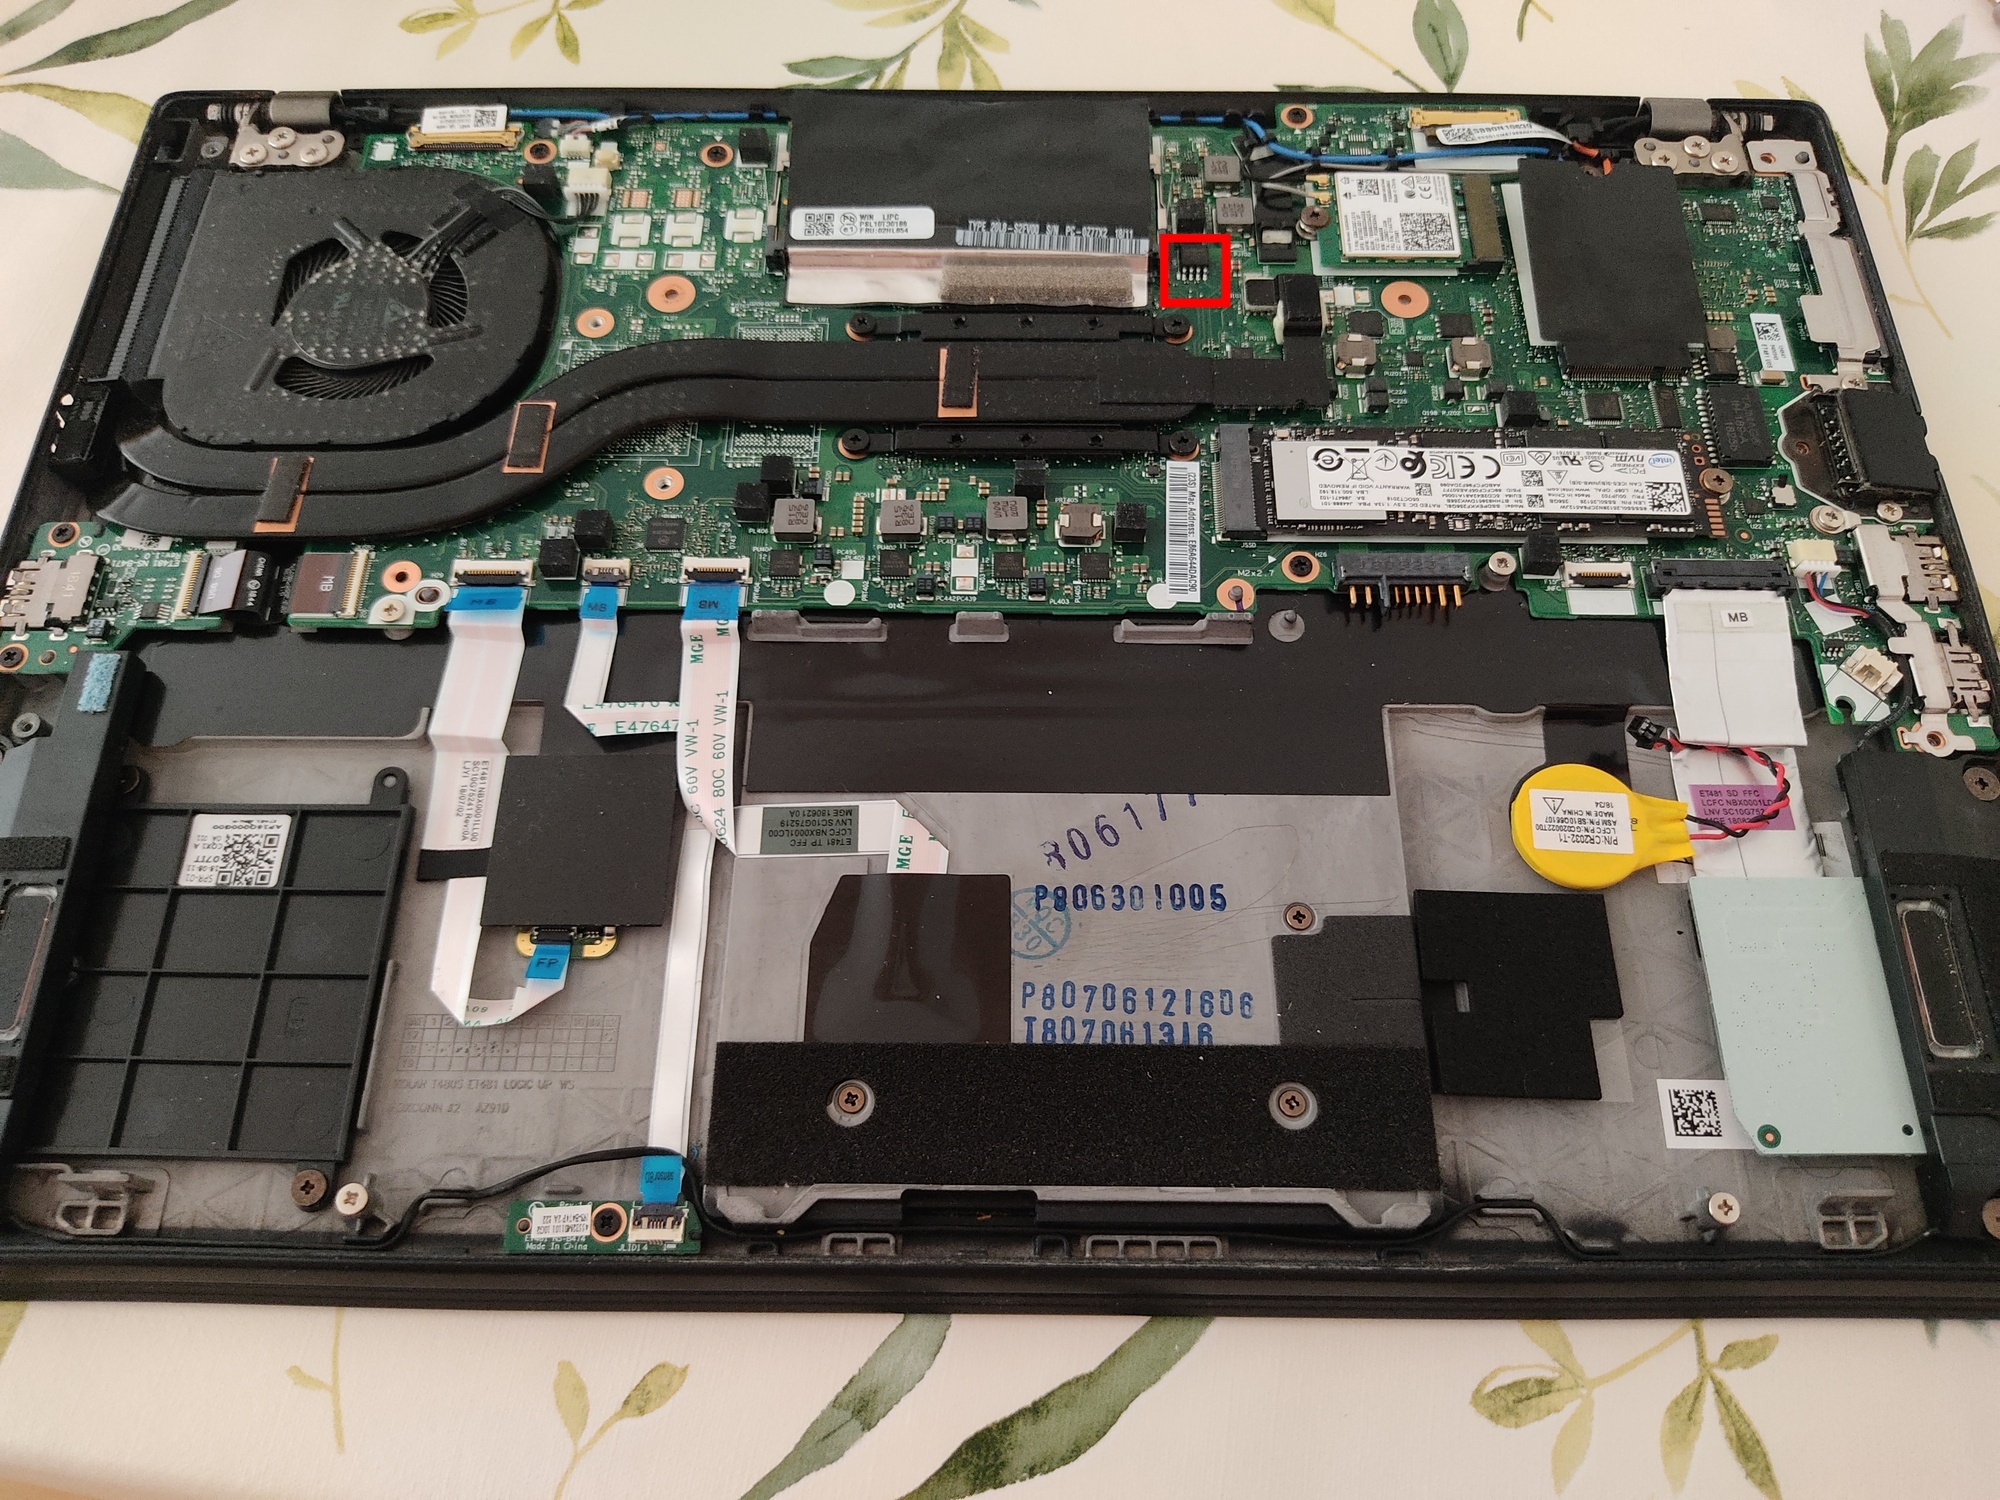
As I said for the thunderbolt chip, the pin 1 of the chip is the one marked with a dot. The pin 1 of the clip must be connected to the pin 1 of the chip.
It is time to start dumping the firmware.
DUMP 1
jjdiaz@laptop-HN-WX9X:\~/git/libreboot/lbmk/dumps/bios$ ../../elf/flashprog/flashprog -p serprog:dev=/dev/ttyACM0,spispeed=16M -r dump1.bin flashprog p1.4-2-gf730186 on Linux 6.8.0-60-generic (x86_64) flashprog is free software, get the source code at https://flashprog.org

Using clock_gettime for delay loops (clk_id: 1, resolution: 1ns). serprog: Programmer name is "pico-serprog" Found Winbond flash chip "W25Q128.V" (16384 kB, SPI) on serprog. Reading flash... done.
DUMP 2
jjdiaz@laptop-HN-WX9X:\~/git/libreboot/lbmk/dumps/bios$ ../../elf/flashprog/flashprog -p serprog:dev=/dev/ttyACM0,spispeed=16M -r dump2.bin flashprog p1.4-2-gf730186 on Linux 6.8.0-60-generic (x86_64) flashprog is free software, get the source code at https://flashprog.org

Using clock_gettime for delay loops (clk_id: 1, resolution: 1ns). serprog: Programmer name is "pico-serprog" Found Winbond flash chip "W25Q128.V" (16384 kB, SPI) on serprog. Reading flash... done.
DUMP 3
jjdiaz@laptop-HN-WX9X:\~/git/libreboot/lbmk/dumps/bios$ ../../elf/flashprog/flashprog -p serprog:dev=/dev/ttyACM0,spispeed=16M -r dump3.bin flashprog p1.4-2-gf730186 on Linux 6.8.0-60-generic (x86_64) flashprog is free software, get the source code at https://flashprog.org

Using clock_gettime for delay loops (clk_id: 1, resolution: 1ns). serprog: Programmer name is "pico-serprog" Found Winbond flash chip "W25Q128.V" (16384 kB, SPI) on serprog. Reading flash... done.
Once I got all the dumps, I compared them to ensure the content for all of them was exactly the same.
jjdiaz@laptop-HN-WX9X:\~/git/libreboot/lbmk/dumps/bios$ sha512sum dump1.bin 71251f4c4e41832a66aaaae91d01119988c5253e66c1d4b61ce6975e2d04fb4e80524f797bf1c9102a1cd9a7239775291d0be18a67704666547acc8746d9b518  dump1.bin

jjdiaz@laptop-HN-WX9X:\~/git/libreboot/lbmk/dumps/bios$ sha512sum dump2.bin 71251f4c4e41832a66aaaae91d01119988c5253e66c1d4b61ce6975e2d04fb4e80524f797bf1c9102a1cd9a7239775291d0be18a67704666547acc8746d9b518  dump2.bin

jjdiaz@laptop-HN-WX9X:\~/git/libreboot/lbmk/dumps/bios$ sha512sum dump3.bin 71251f4c4e41832a66aaaae91d01119988c5253e66c1d4b61ce6975e2d04fb4e80524f797bf1c9102a1cd9a7239775291d0be18a67704666547acc8746d9b518  dump3.bin
Enable hyper-threading
By default, libreboot is not configured to manage hyper-threading. It means that, for the thinkpad t480s, instead of being able to use 8 threads, only 4 would be available.
To be able to use the full power of the processor, I configured hyper-threading prior to build the BIOS firmware.
To do so, inside the cloned repository folder, I ran below command.
./mk -m coreboot t480s_vfsp_16mb The command opened a terminal window where different customization can be done.
To enable hyper-threading, I had to go to Chipset -> Enable Hyper – Threading and check it.
Build BIOS firmware
Inside the cloned repository folder, I ran below command.
./mk -b coreboot t480s_vfsp_16mbOnce the command finished, files generated were placed in ./bin/t480s_vfsp_16mb
Configure ethernet MAC address
By default, libreboot configures the same ethernet MAC address for all devices. It means that if more than one device that use libreboot is connected to the same network, they will have connectivity issues because of the matching ethernet MAC addresses.
The fix to avoid this situation is to configure the ethernet MAC address in libreboot configuration to be the one defined by the manufacturer for the laptop’s ethernet card.
First thing I did is to install ifdtool. Inside the cloned repository folder, I ran below command.
cd src/coreboot/default/util/ifdtool && makeI also installed nvmutil. Inside the cloned repository folder, I ran below command.
cd util/nvmutil && makeI already generated a bin file that I will flash to the BIOS. This is the file I need to work on to set the proper MAC address. I had to unblock the BIOS file prior to extracting the MAC address. This command will create a new file called bin/t480s_vfsp_16mb/seabios_t480s_vfsp_16mb_libgfxinit_corebootfb.rom.new
./src/coreboot/default/util/ifdtool/ifdtool --platform sklkbl --unlock bin/t480s_vfsp_16mb/seabios_t480s_vfsp_16mb_libgfxinit_corebootfb.romI ran below command to split the BIOS file into several files which are related to the different sections that are in the BIOS.
./src/coreboot/default/util/ifdtool/ifdtool --platform sklkbl -x bin/t480s_vfsp_16mb/seabios_t480s_vfsp_16mb_libgfxinit_corebootfb.rom.newThe MAC is located in one of the generated files called flashregion_3_gbe.bin
I ran below command to set the correct MAC.
./util/nvmutil/nvm flashregion_3_gbe.bin setmac ex:6x:6x:4x:ax:9xThe file contains also a checksum and it needs to be a valid one. Because I have changed the content of the file, the checksum needs to be updated. To do that, I ran below commands.
./util/nvmutil/nvm flashregion_3_gbe.bin setchecksum 0
./util/nvmutil/nvm flashregion_3_gbe.bin setchecksum 1
Last step is to inject the new MAC address into the BIOS file generated previously
./src/coreboot/default/util/ifdtool/ifdtool --platform sklkbl -i gbe:flashregion_3_gbe.bin bin/t480s_vfsp_16mb/seabios_t480s_vfsp_16mb_libgfxinit_corebootfb.rom.newA new file called bin/t480s_vfsp_16mb/seabios_t480s_vfsp_16mb_libgfxinit_corebootfb.rom.new.new is generated. This is the file I had to flash to the BIOS chip.
Flash BIOS firmware
Flashing the BIOS was as simple as running below command
./elf/flashprog/flashprog -p serprog:dev=/dev/ttyACM0 -w ../bin/t480s_vfsp_16mb/seabios_t480s_vfsp_16mb_libgfxinit_corebootfb.rom.new.new
At this point, flashing the BIOS process was completed.
In my case, I had to install an OS because my laptop didn’t have any OS that used grub to boot. There are a bunch of tutorials on the internet to install an OS so I won’t describe it.
I hope you enjoyed this read. I really enjoyed doing all the steps as well as writing my experience.
Thanks for reading my blog. See you in the next post!